Android Studio[JAVA]
[깡쌤의 안드로이드 프로그래밍] 4장 실습 (2022 ver)
- -
레이아웃을 활용한 다양한 뷰 배치
이번 장에서 다루는 레이아웃 클래스는 아래와 같다.
(1) LinearLayout
(2) RelativeLayout
(3) FrameLayout
(4) TableLayout
(5) GridLayout
(6) ConstraintLayout
(1) LinearLayout
해당 레이아웃에 포함된 뷰를 순서대로 가로나 세로 방향으로 나열한다. 이때 orientation 속성을 제공한다.
카카오톡 채팅 목록 같은 경우, 이미지 파일, 이름, 채팅이 순서대로 나와있다. 이는 레이아웃을 중첩하여 사용한 것이다. 이를 하기에 앞서, LinearLayout의 속성을 먼저 보도록 하자.
- gravity, layout_gravity
gravity 속성은 뷰의 내용(content)을 뷰 영역 내에서 어디에 나타낼지를 설정하고, layout_gravity 속성은 뷰를 LinearLayout 영역 내에서 어디에 나타낼지를 설정한다.
예를 들어, gravity는 text 같은 뷰의 내용을 어디에 위치시킬지를 지정해주고, layout_gravity는 해당 레이아웃을 전체 LinearLayout 중 어디에 배치시킬지를 나타낸다.
예를 살펴보자.
xml 파일은 아래와 같다.
<?xml version="1.0" encoding="utf-8"?>
<LinearLayout xmlns:android="http://schemas.android.com/apk/res/android"
    xmlns:app="http://schemas.android.com/apk/res-auto"
    xmlns:tools="http://schemas.android.com/tools"
    android:layout_width="match_parent"
    android:layout_height="match_parent"
    android:orientation="vertical"
    tools:context=".MainActivity">

    <TextView
        android:layout_width="150dp"
        android:layout_height="150dp"
        android:text="Hello World!"
        android:background="#FF0000"
        android:textColor="#FFFFFF"
        android:layout_gravity="center_vertical|center_horizontal"
        android:gravity="bottom|right"/>

</LinearLayout>
[실행 화면]

이때, 아래의 속성은 원하는대로 정렬되지 않았다.
android:layout_gravity="center_vertical|center_horizontal"이는 초기 LinearLayout의 orientation="vertical"로 지정해주었기 때문이다.
이렇게 세로 방향으로 지정했다면 세로 방향으로 뷰가 포함된 순서대로 나열되어 세로 방향의 layout_gravity가 적용되지 않는다.
반대로, orientation="horizontal"이라면 가로 방향의 layout_gravity가 적용되지 않게 된다.
그렇다면 가운데로 정렬을 하고 싶을 때에는 어떻게 해줘야 할까?
LinearLayout의 gravity 속성을 이용하면 된다.
android:gravity="center"다음과 같이 지정해주면 아래와 같은 결과 화면을 볼 수 있다.
 |
- weight
여백과 관련된 속성이다. 여백 발생 시 화면에 배치된 뷰들이 확장해서 차지하게 할 때 이용된다.
<?xml version="1.0" encoding="utf-8"?>
<LinearLayout xmlns:android="http://schemas.android.com/apk/res/android"
    xmlns:app="http://schemas.android.com/apk/res-auto"
    xmlns:tools="http://schemas.android.com/tools"
    android:layout_width="match_parent"
    android:layout_height="match_parent"
    android:orientation="vertical"
    tools:context=".MainActivity">

    <TextView
        android:layout_width="match_parent"
        android:layout_height="0dp"
        android:layout_weight="1"
        android:background="#FF0000"/>

    <TextView
        android:layout_width="match_parent"
        android:layout_height="0dp"
        android:layout_weight="2"
        android:background="#00FF00"/>

    <TextView
        android:layout_width="match_parent"
        android:layout_height="0dp"
        android:layout_weight="1"
        android:background="#0000FF"/>

</LinearLayout>
[실행 결과]

layout_height을 모두 0으로 지정하게 되면, 뷰는 영역을 차지하지 못하여 화면에서 안보이게 된다.
이는 결국 화면 전체가 여백이 되는 것이다. 이때 모두 layout_weight을 설정해주면 여백 확장 기법을 사용하게 된다.
[실습 4-1] 목록 화면 구성 : LinearLayout
예시를 위해 다음 파일을 이용하도록 한다.
<?xml version="1.0" encoding="utf-8"?>
<LinearLayout xmlns:android="http://schemas.android.com/apk/res/android"
    xmlns:app="http://schemas.android.com/apk/res-auto"
    xmlns:tools="http://schemas.android.com/tools"
    android:layout_width="match_parent"
    android:layout_height="match_parent"
    android:padding="16dp"
    android:orientation="horizontal"
    tools:context=".MainActivity">

    <ImageView
        android:layout_width="wrap_content"
        android:layout_height="wrap_content"
        android:src="@drawable/icon" />

    <LinearLayout
        android:layout_width="wrap_content"
        android:layout_height="wrap_content"
        android:orientation="vertical"
        android:layout_weight="1">

        <TextView
            android:layout_width="wrap_content"
            android:layout_height="wrap_content"
            android:text="홍길동"
            android:textSize="20dp"
            android:textStyle="bold"
            android:layout_marginLeft="16dp" />

        <TextView
            android:layout_width="wrap_content"
            android:layout_height="wrap_content"
            android:text="안녕하세요. 잘 지내시는 지요?"
            android:layout_marginTop="16dp"
            android:layout_marginLeft="16dp" />
    </LinearLayout>

    <TextView
        android:layout_width="wrap_content"
        android:layout_height="wrap_content"
        android:text="17.1.26"
        android:layout_marginLeft="16dp" />
</LinearLayout>
[실행 결과]

날짜 출력 TextView가 LinearLayout의 weight 속성에 의하여 오른쪽으로 밀려서 출력되게 된다.
(2) RelativeLayout
화면에 이미 배치된 뷰를 기준으로 다른 뷰의 위치를 지정하는 레이아웃이다.
Relative에서 상대 위치를 지정하는 속성은 다음처럼 4개를 제공한다.
(1) android:layout_above : 기준 뷰의 윗부분에 배치
(2) android:layout_below : 기준 뷰의 아랫부분에 배치
(3) android:layout_toLeftOf : 기준 뷰의 왼쪽에 배치
(4) android:layout_toRightOf : 기준 뷰의 오른쪽에 배치
이때, 기준이 되는 뷰와 왼쪽 변을 맞추거나 윗변을 맞추는 등의 작업도 중요하다.
아래 속성을 살펴보자.
- align
문자열 하단을 맞춰주는 속성이다.
(1) android:layout_alignTop : 기준 뷰와 윗부분을 정렬
(2) android:layout_alignBottom : 기준 뷰와 아랫부분을 정렬
(3) android:layout_alignLeft : 기준 뷰와 왼쪽을 정렬
(4) android:layout_alignRight : 기준 뷰와 오른쪽을 정렬
(5) android:layout_alignBaseline : 기준 뷰와 텍스트 기준선을 정렬
- alignParentXXX
RelativeLayout으로 뷰를 배치할 때 특정 뷰를 상하좌우로 밀 수 있는 속성이다.
(1) android:layout_alignParentTop : 부모의 윗부분에 뷰의 상단을 위치
(2) android:layout_alignParentBottom : 부모의 아랫부분에 뷰의 상단을 위치
(3) android:layout_alignParentLeft : 부모의 왼쪽에 뷰의 상단을 위치
(4) android:layout_alignParentRight : 부모의 오른쪽에 뷰의 상단을 위치
(5) android:layout_centerHorizontal : 부모의 가로 방향 중앙에 뷰를 위치
(6) android:layout_centerVertocal : 부모의 세로 방향 중앙에 뷰를 위치
(7) android:layout_centerInParent : 부모의 가로세로 중앙에 뷰를 위치
이를 사용할 때, alignParentXXX = "true" 로 지정해주어야 한다.
[실습 4-2] 목록 화면 구성 : RelativeLayout
위의 LinearLayout을 예제로 든 것을 바탕으로, 똑같이 이를 구현해보면 아래와 같다.
<?xml version="1.0" encoding="utf-8"?>
<RelativeLayout xmlns:android="http://schemas.android.com/apk/res/android"
    xmlns:app="http://schemas.android.com/apk/res-auto"
    xmlns:tools="http://schemas.android.com/tools"
    android:layout_width="match_parent"
    android:layout_height="match_parent"
    android:padding="16dp"
    android:orientation="horizontal"
    tools:context=".MainActivity">

    <ImageView
        android:id="@+id/icon"
        android:layout_width="wrap_content"
        android:layout_height="wrap_content"
        android:src="@drawable/icon" />
    <TextView
        android:id="@+id/name"
        android:layout_width="wrap_content"
        android:layout_height="wrap_content"
        android:layout_marginLeft="16dp"
        android:text="홍길동"
        android:textSize="20dp"
        android:textStyle="bold"
        android:layout_toRightOf="@id/icon" />
    <TextView
        android:id="@+id/content"
        android:layout_width="wrap_content"
        android:layout_height="wrap_content"
        android:layout_marginTop="16dp"
        android:text="안녕하세요. 잘 지내시지요?"
        android:layout_below="@id/name"
        android:layout_alignLeft="@id/name" />
    <TextView
        android:id="@+id/date"
        android:layout_width="wrap_content"
        android:layout_height="wrap_content"
        android:text="19.1.26"
        android:layout_alignBaseline="@id/name"
        android:layout_alignParentRight="true" />
</RelativeLayout>
[실행 결과]

(3) FrameLayout
레이아웃에 포함된 뷰들을 같은 영역에 겹쳐서 배치할 때 사용한다.
<?xml version="1.0" encoding="utf-8"?>
<FrameLayout xmlns:android="http://schemas.android.com/apk/res/android"
    xmlns:app="http://schemas.android.com/apk/res-auto"
    xmlns:tools="http://schemas.android.com/tools"
    android:layout_width="match_parent"
    android:layout_height="match_parent"
    tools:context=".MainActivity">

    <TextView
        android:layout_width="300dp"
        android:layout_height="300dp"
        android:background="#FF0000"/>
    <TextView
        android:layout_width="200dp"
        android:layout_height="200dp"
        android:background="#00FF00"/>
    <TextView
        android:layout_width="100dp"
        android:layout_height="100dp"
        android:background="#0000FF"/>
</FrameLayout>
[실행 결과]
뷰가 포함된 순서대로 배치되어 맨 마지막에 포함된 뷰가 가장 위에 보인다.

FrameLayout을 사용하는 목적은 대부분 같은 영역에 여러 뷰를 겹치게 한 다음, 한 순간에 하나의 뷰만 보이게 하기 위함이다. 이를 위해 visibiltiy 속성을 사용하고는 한다.
- 탭 화면
화면 여러 개를 준비한 다음, 사용자가 버튼을 누를 때 버튼과 연결된 화면을 하나씩 보여주는 형태이다.
이를 위해 TabHost라는 클래스를 이용한다.
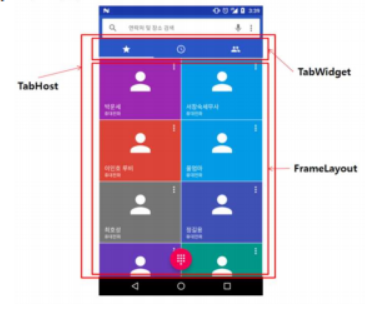
TabHost 하위에는 꼭 TabWidget과 FrameLayout으로 구성해야 한다.
- TabHost : 탭 화면 전체 영역
- TabWidget : 탭 버튼이 들어갈 영역
- FrameLayout : 탭 버튼 클릭시 보일 화면 영역
TabHost를 위한 레이아웃 xml에는 TabWidget과 FrameLayout의 id 값이 반드시 다음과 같아야 한다.
TabWidget의 id 값 : android:id=”@android:id/tabs”
FrameLayout의 id 값: android:id=”@android:id/tabcontent"
탭 화면을 완성하려면 자바 코드에서도 작업이 필요하다.
코드에서 각 탭 버튼과 버튼이 눌렸을 때 나올 본문 내용을 구성해야 하기 때문이다.
그러나 사용자가 탭 버튼을 클릭했을 때 어느 화면이 나올지를 지정하는 코드는 작성하지 않아도 된다.
탭 버튼과 버튼에 따라 나타낼 화면을 TabSpec 클래스로 결합하여 추가하는 방식이다.
즉, TabSpec 안에 버튼과 본문이 결합되어 있어 버튼을 누르면 해당 버튼과 결합된 본문이 나오는 구조이다.

TabSpec 클래스는 "탭 버튼"과 "본문 화면"의 쌍을 결합해주는 역할이다.
TabSpec에는 버튼인 indicator와, 본문인 content가 있다.
위의 화면을 만들기 위한 java 코드를 살펴보도록 하자.
TabHost tabHost = findViewById(R.id.host);
tabHost.setup();
// 각 TabSpec을 만들 때 매개변수의 문자열은 각 TabSpec의 식별자 문자열
TabHost.TabSpec spec = tabHost.newTabSpec("tab1");
// tab button 구성
spec.setIndicator(null, ResourcesCompat.getDrawable(getResources(), R.drawable.tab_icon1, null));
// tab 본문 구성
spec.setContent(R.id.tab_content1);
tabHost.addTab(spec);
우선 TabHost를 레이아웃 XML에서 획득하여 setup()함수로 초기화한다.
탭 하나를 구성하기 이해 TabSpec을 newTabSpec() 함수로 생성해준다.
newTabSpec() 함수의 매개변수를 "tab1"로 지정하였는데, 이 문자열은 개발자가 지정한 임의의 문자열이며, 각 탭 화면을 코드에서 식별할 때 사용한다.
하나의 TabSpec에 탭 버튼을 구성학고자 setIndicator() 함수를 이용했으며, 탭 버튼은 문자열이나 이미지로 구성할 수 있다.
TabSpec의 본문을 지정하고자 setContent() 함수를 이용하였다.
이렇게 만들어진 최종 TabSpec을 최종 TabHost에 tabHost.addTab() 함수로 포함해주면 된다.
[실습 4-3] 탭 화면
예제를 위해 필요한 파일은 아래와 같다.
tab_icon1.png
0.00MB
tab_icon2.png
0.00MB
tab_icon3.png
0.00MB
<xml 파일>
<?xml version="1.0" encoding="utf-8"?>
<TabHost xmlns:android="http://schemas.android.com/apk/res/android"
    xmlns:app="http://schemas.android.com/apk/res-auto"
    xmlns:tools="http://schemas.android.com/tools"
    android:id="@+id/host"
    android:layout_width="match_parent"
    android:layout_height="match_parent"
    tools:context=".Lab4_3Activity">

    <LinearLayout
        android:layout_width="match_parent"
        android:layout_height="match_parent"
        android:orientation="vertical">
    <TabWidget
        android:id="@android:id/tabs"
        android:layout_width="match_parent"
        android:layout_height="wrap_content"
        android:background="#FF0" />
    <FrameLayout
        android:id="@android:id/tabcontent"
        android:layout_width="match_parent"
        android:layout_height="match_parent">
    <TextView
        android:id="@+id/tab_content1"
        android:layout_width="match_parent"
        android:layout_height="match_parent"
        android:text="Tab1"
        android:textSize="30dp"
        android:textStyle="bold"
        android:gravity="center" />
        <TextView
            android:id="@+id/tab_content2"
            android:layout_width="match_parent"
            android:layout_height="match_parent"
            android:text="Tab2"
            android:textSize="30dp"
            android:textStyle="bold"
            android:gravity="center" />
        <TextView
            android:id="@+id/tab_content3"
            android:layout_width="match_parent"
            android:layout_height="match_parent"
            android:text="Tab3"
            android:textSize="30dp"
            android:textStyle="bold"
            android:gravity="center" />
    </FrameLayout>
    </LinearLayout>
</TabHost>
< java 파일 >
public class Lab4_3Activity extends AppCompatActivity {

    @Override
    protected void onCreate(Bundle savedInstanceState) {
        super.onCreate(savedInstanceState);
        setContentView(R.layout.activity_lab4_3);

        TabHost tabHost = findViewById(R.id.host);
        tabHost.setup();
        TabHost.TabSpec spec = tabHost.newTabSpec("tab1");
        spec.setIndicator(null, ResourcesCompat.getDrawable(getResources(), R.drawable.tab_icon1, null));
        spec.setContent(R.id.tab_content1);
        tabHost.addTab(spec);
        spec = tabHost.newTabSpec("tab2");
        spec.setIndicator(null, ResourcesCompat.getDrawable(getResources(), R.drawable.tab_icon2, null));
        spec.setContent(R.id.tab_content2);
        tabHost.addTab(spec);
        spec = tabHost.newTabSpec("tab3");
        spec.setIndicator(null, ResourcesCompat.getDrawable(getResources(), R.drawable.tab_icon3, null));
        spec.setContent(R.id.tab_content3);
        tabHost.addTab(spec);
    }
}
[실행 결과]
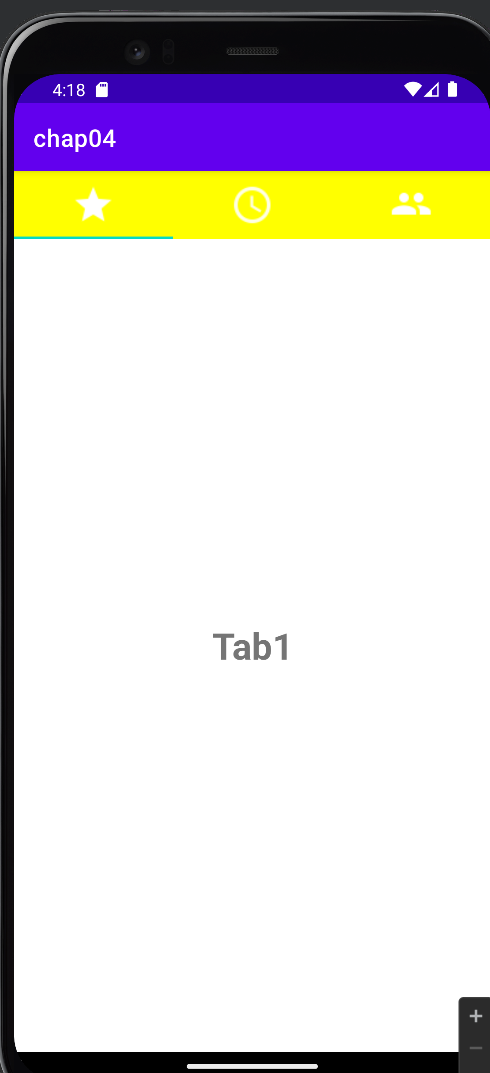
이때, TabWidget과 FrameLayout 부분에서 다음과 같이 id 속성을 부여하였다.
android:id="@android:id/tabs"android:id="@android:id/tabcontent"이둘은 우리가 평소 id 속성값을 지정하는 형식과 많이 다르다. 평소 id값을 지정할 때는 아래와 같이 한다.
android:id="@+id/name"평소 "@+id/name" 처럼 지정하는 것은 id 값을 앱의 R.java 파일에 등록하여 이용하겠다는 의도이며,
"@android:id/tabs"는 id 값을 앱의 R.java 파일이 아닌 안드로이드 라이브러리의 R.java 파일에 등록된 것을 이용하겠다는 의도다.
즉, 레이아웃 XML을 개발자가 만들고 이 뷰를 findViewById() 함수로 얻는 코드도 개발자가 작성한다면, 개발자 마음대로 id값을 지정하여 사용하면 된다.
그런데 만약, XML 파일은 개발자가 만드는데 이 뷰를 findViewById() 함수로 id 값을 얻는 곳이 라이브러리 내 코드라면 id를 tabs와 같이 써줘야 한다. 이 라이브러리 내 코드는 자바 코드에서 host.setup() 함수 부분이다.
setup() 함수 내부에서 TabHost 하위의 TabWidget과 FrameLayout을 획득한다. 따라서 두 뷰를 등록할 때는 라이브러리의 android.R.java 파일의 id 값을 이용해야 하며, 그렇지 않으면 런타임 에러가 발생한다.
(4) TableLayout
TableLayout은 뷰를 테이블(table) 구조로 나열하는 레이아웃이다.
이를 사용하는 대표적인 예가 계산기 앱 화면을 들 수 있다.
TableLayout 내에서 하나의 뷰가 여러 셀을 차지하게 할 수도 있으며, 여백이 발생할 경우 특정 열(column)을 확장할 수도 있고, 화면 크기를 벗어나는 순간 특정 열을 축소하는 등 다양하게 설정할 수 있다.
TableLayout의 속성
// 화면 크기를 벗어나는 경우 인덱스 0,1의 열 크기를 줄임.
android:shirnkColumns="0,1"

// 화면 여백이 발생할 경우 인덱스 1의 열 크기를 늘림
android:stretchColumns="1"

// 뷰의 위치 지정, 인덱스 1의 위치에 뷰가 위치
android:layout_column="1"

// 두 개의 열을 하나의 뷰가 차지
android:layout_span="2"
(5) GridLayout
GridLayout은 뷰를 테이블 구조를 나열한다. 이 점에서는 TableLayout과 유사하고, 뷰가 레이아웃에 포함된 순서대로 가로나 세로 방향으로 나열된다는 점에서 LinearLayout과도 유사하다. 또한 LinearLayout에는 없는 자동 개행 능력도 있어서 화면에는 TableLayout처럼 보이기도 한다.
GridLayout을 사용하는 최종 목적은 TableLayout처럼 테이블 구조의 화면을 구성하는 데 있다.
GridLayout을 사용하는 이유는 TableLayout에서는 각 행(row)을 TableRow로 묶어줘야 하므로, 셀의 개수를 예상할 수 없거나 가변적인 경우 화면 구성이 복잡해진다. 하지만 GridLayout은 별도로 행을 표현하지 않아도 뷰를 순서대로 포함만 하면 알아서 개행하여 행이 자동으로 표현되므로 편리한 측면이 있다. 대표적인 예로는 갤러리 앱의 이미지 목록 화면이 있다.
GridLayout의 속성
orientation : 뷰의 배치 방향을 지정, 기본값은 가로 방향
columnCount : 가로 방향일 때 한 줄에 몇 개의 뷰를 나열할 것인지 지정
rowCoutn : 세로 방향일 때 한 줄에 몇 개의 뷰를 나열할 것인지 지정
-> orientation이 "horizontal"이면 columnCount만 의미가 있고 rowCount는 적용되지 않으며,
orientation이 "vertical"이면 rowCount만 의미가 있고 columnCount는 적용되지 않는다.
또한, GridLayout에 뷰를 포함할 때 다음의 속성을 지정하여 다양하게 꾸밀 수 있다.
layout_column : 뷰가 위치할 열 인덱스 지정
layout_row : 뷰가 위치할 행 인덱스 지정
layout_columnSpan : 가로 방향으로 여러 열을 하나의 뷰가 차지하고자 할 때
layout_rowSpan : 세로 방향으로 여러 행을 하나의 뷰가 차지하고자 할 때
layout_gravity : 하나의 열 내에서 뷰의 정렬 위치 지정
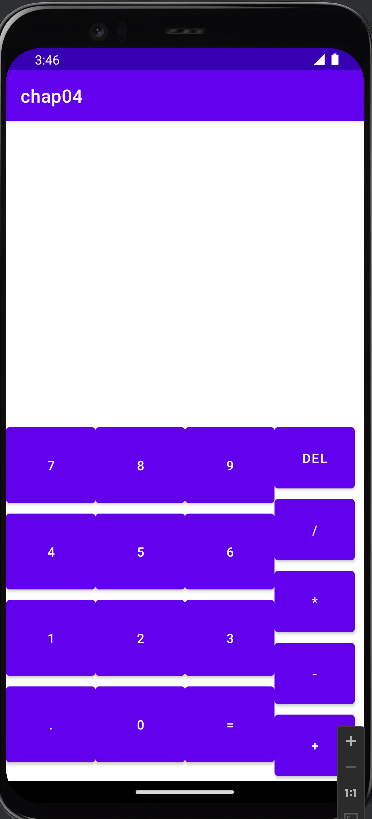
[실습 4-4] TableLayout, GridLayout 활용
실제 계산기 화면을 만들어보도록 하자.
[xml 파일]
<?xml version="1.0" encoding="utf-8"?>
<LinearLayout xmlns:android="http://schemas.android.com/apk/res/android"
    xmlns:app="http://schemas.android.com/apk/res-auto"
    xmlns:tools="http://schemas.android.com/tools"
    android:layout_width="match_parent"
    android:layout_height="match_parent"
    android:orientation="vertical"
    tools:context=".Lab4_4Activity">

    <!-- TextView에 weight를 설정하여 버튼 부분이 하단에 위치하게 처리 -->
    <TextView
        android:layout_width="match_parent"
        android:layout_height="0dp"
        android:layout_weight="1" />

    <LinearLayout
        android:layout_width="match_parent"
        android:layout_height="wrap_content"
        android:orientation="horizontal">
        <!-- 폰 화면 사이즈 호환성을 위해 가로 사이즈를 모두 0dp로 지정 후 weight값 지정 -->
        <TableLayout
            android:layout_width="0dp"
            android:layout_height="match_parent"
            android:layout_weight="3">

        <TableRow>
            <Button
                android:layout_width="0dp"
                android:layout_weight="1"
                android:text="7"
                android:paddingTop="32dp"
                android:paddingBottom="32dp" />
            <Button
                android:layout_width="0dp"
                android:layout_weight="1"
                android:text="8"
                android:paddingTop="32dp"
                android:paddingBottom="32dp" />
            <Button
                android:layout_width="0dp"
                android:layout_weight="1"
                android:text="9"
                android:paddingTop="32dp"
                android:paddingBottom="32dp" />
        </TableRow>

        <TableRow>
            <Button
                android:layout_width="0dp"
                android:layout_weight="1"
                android:text="4"
                android:paddingTop="32dp"
                android:paddingBottom="32dp" />
            <Button
                android:layout_width="0dp"
                android:layout_weight="1"
                android:text="5"
                android:paddingTop="32dp"
                android:paddingBottom="32dp" />
            <Button
                android:layout_width="0dp"
                android:layout_weight="1"
                android:text="6"
                android:paddingTop="32dp"
                android:paddingBottom="32dp" />
        </TableRow>

        <TableRow>
            <Button
                android:layout_width="0dp"
                android:layout_weight="1"
                android:text="1"
                android:paddingTop="32dp"
                android:paddingBottom="32dp" />
            <Button
                android:layout_width="0dp"
                android:layout_weight="1"
                android:text="2"
                android:paddingTop="32dp"
                android:paddingBottom="32dp" />
            <Button
                android:layout_width="0dp"
                android:layout_weight="1"
                android:text="3"
                android:paddingTop="32dp"
                android:paddingBottom="32dp" />
        </TableRow>

            <TableRow>
                <Button
                    android:layout_width="0dp"
                    android:layout_weight="1"
                    android:text="."
                    android:paddingTop="32dp"
                    android:paddingBottom="32dp" />
                <Button
                    android:layout_width="0dp"
                    android:layout_weight="1"
                    android:text="0"
                    android:paddingTop="32dp"
                    android:paddingBottom="32dp" />
                <Button
                    android:layout_width="0dp"
                    android:layout_weight="1"
                    android:text="="
                    android:paddingTop="32dp"
                    android:paddingBottom="32dp" />
            </TableRow>
        </TableLayout>

        <GridLayout
            android:layout_width="0dp"
            android:layout_height="match_parent"
            android:layout_weight="1"
            android:orientation="vertical">
            <Button
                android:text="DEL"
                android:paddingTop="24dp"
                android:paddingBottom="24dp" />
            <Button
                android:text="/"
                android:paddingTop="24dp"
                android:paddingBottom="24dp" />
            <Button
                android:text="*"
                android:paddingTop="24dp"
                android:paddingBottom="24dp" />
            <Button
                android:text="-"
                android:paddingTop="24dp"
                android:paddingBottom="24dp" />
            <Button
                android:text="+"
                android:paddingTop="24dp"
                android:paddingBottom="24dp" />
        </GridLayout>
    </LinearLayout>
</LinearLayout>
[실행 결과]
(6) ConstraintLayout
- 상대적 위치 지정
RelativeLayout과 마찬가지로 상대 위치에 따라 뷰의 배치를 제공한다.
제공되는 상대 위치 속성은 아래와 같다,
layout_constraintLeft_toLeftOf
layout_constraintLeft_toRightOf
layout_constraintRight_toLeftOf
layout_constraintRight_toRightOf
layout_constraintTop_toTopOf
layout_constraintTop_toBottomOf
layout_constraintBottom_toTopOf
layout_constraintBottom_toBottomOf
layout_constraintBaseLine_toBaselineOf
layout_constraintStart_toEndOf
layout_constraintStart_toStartOf
layout_constraintEnd_toStartOf
layout_constraintEnd_toEndOf
속성 값으로 상대 뷰 id 값 혹은 "parent"라는 단어로 상위 뷰를 지칭할 수 있다.
- 여백(margin)
뷰와 뷰 사이 간격 표현을 위해 amrgin 설정을 다음의 속성으로 지정할 수 있다.
android:layout_marginStart
android:layout_marginEnd
android:layout_marginLeft
android:layout_marginTop
android:layout_marginRight
android:layout_marginBottom
또한, 상대 뷰가 View.GONE 상태일 때의 margin 값을 따로 설정할 수 있다.
layout_goneMarginStart
layout_goneMarginEnd
layout_goneMarginLeft
layout_goneMarginTop
layout_goneMarginRight
layout_goneMarginBottom
View.GONE 상태는 뷰가 화면에 보이지 않으며 크기도 확보하지 못하고 있는 상황을 말한다.
상대 뷰가 화면에 보이고 있을 때와 GONE 상태일 때의 margin 값을 다르게 설정하여 상대 뷰가 보이지 않는 상황에 대응할 수 있다.
- 가운데 맞춤과 치우침(bias)
layout_constraintLeft_toLeftOf="parent"와 layout_constraintRight_toRightOf="parent"를 같이 사용하게 되면,
뷰는 화면 중앙에 위치하게 된다. 이때 어느 쪽으로 치우쳐서 나오게 하고 싶다면, bias가 사용된다.
이를 조절하는 속성은 다음과 같다.
layout_constraintHorizontal_bias : 가로 치우침 조절
layout_constraintVertical_bias : 세로 치우침 조절
예 : layout_constraintHorizontal_bias="0.2" 와 같이 사용 // 왼쪽에서 20% 위치에 나타난다.
- 비율(Ratio)
뷰의 크기를 지정할 때 가로세로 비율에 의한 크기를 지정할 수 있다. 이 속성을 이용하려면 크기 값이 0dp로 지정되어 있어야 하는 전제 조건이 필요하다. 즉, layout_width / layout_height 중 하나가 "wrap_content", "100dp" 등의 크기를 지정하고 나머지를 "0dp"로 지정하여 크기를 layout_constraintDimensionRatio를 이용하여 배율로 결정할 수 있다. 이 속성은 다른 constraint 속성이 함께 지정된 경우에만 적용된다.
배율로 크기를 지정할 때 layout_width, layout_height 값이 모두 0인 경우도 가능하다. 단, 그런 경우에는 속성값에 "W" 혹은 "H" 값을 지정하여 어느 쪽의 크기를 배율에 맞게 조정할 것인지 지정해주어야 한다.
예 : layout_constraintDimensionRatio="H,2:1"
해당 실습 자료는 아래 사이트에서 참고할 수 있다.
https://github.com/hyunseokSon/AndroidLab/tree/master/chap04
GitHub - hyunseokSon/AndroidLab: [깡샘의 안드로이드 프로그래밍] 실습자료
[깡샘의 안드로이드 프로그래밍] 실습자료. Contribute to hyunseokSon/AndroidLab development by creating an account on GitHub.
github.com
'Android Studio[JAVA]' 카테고리의 다른 글
| 소셜 로그인 (구글, Google 편) (0) | 2023.04.07 |
|---|---|
| 기초 뷰 활용 (0) | 2022.12.21 |
| 뷰의 기초 중요 속성 (2) | 2022.12.20 |
| [깡쌤의 안드로이드 프로그래밍] 3장 실습 (2022 ver) (0) | 2022.12.20 |
| [Android/Java] 안드로이드 스튜디오(JAVA) - 카카오톡으로 로그인 기능 구현하기 [2022] (2) | 2022.08.31 |
Contents
소중한 공감 감사합니다